The Rachel is a cut and a blowout—not just a length
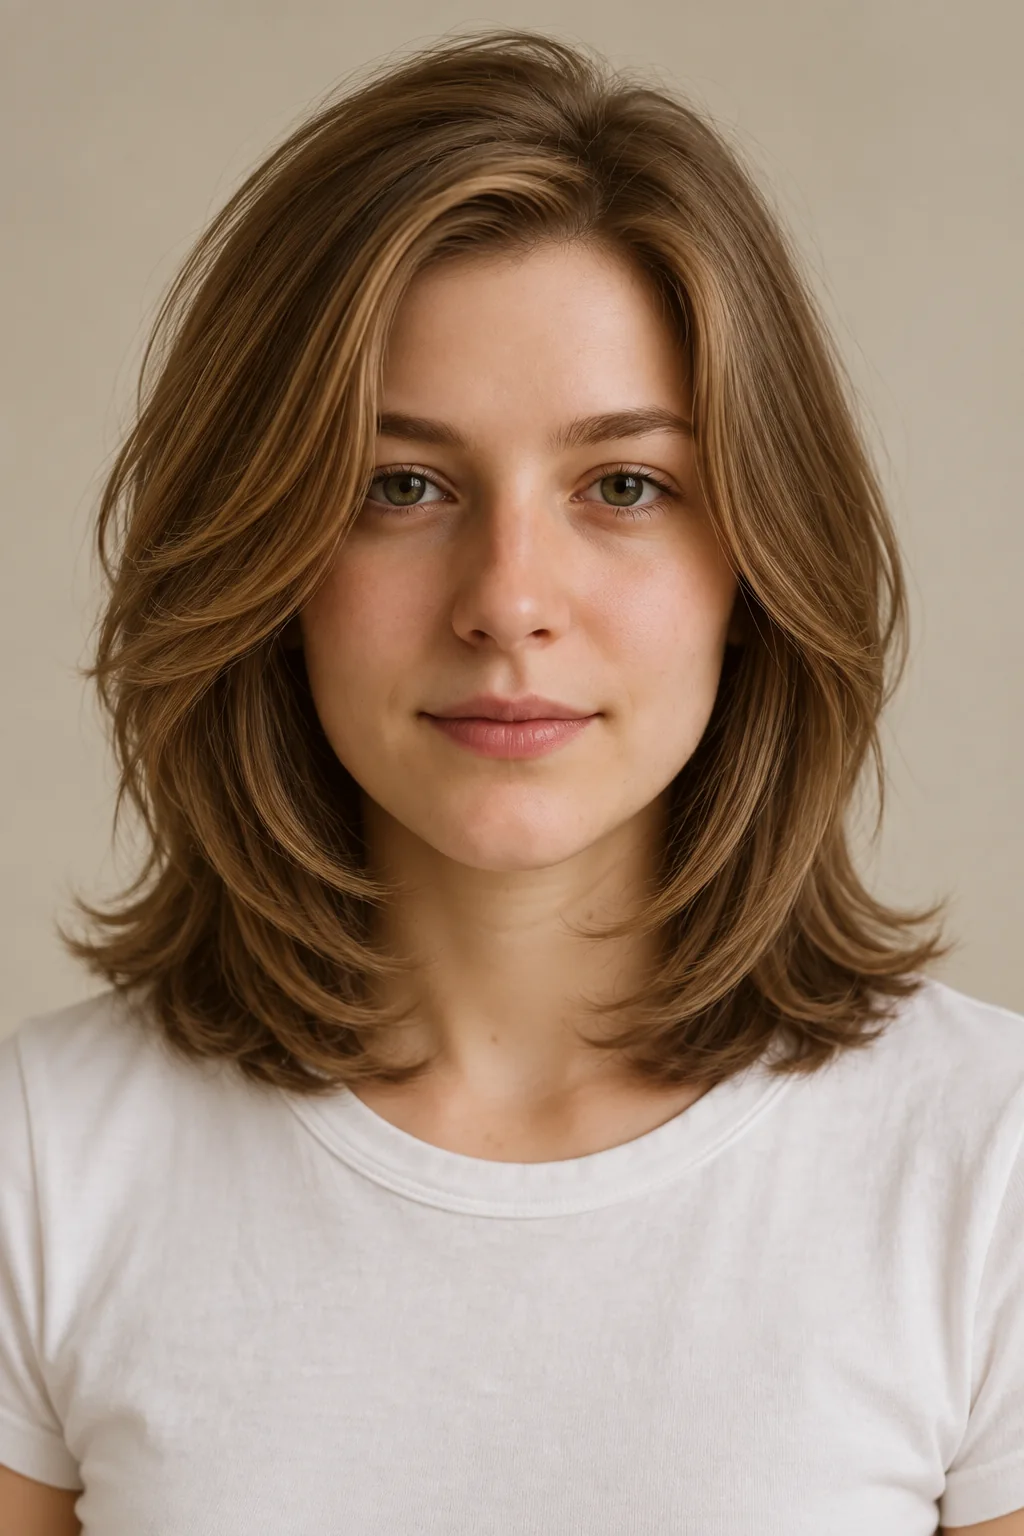
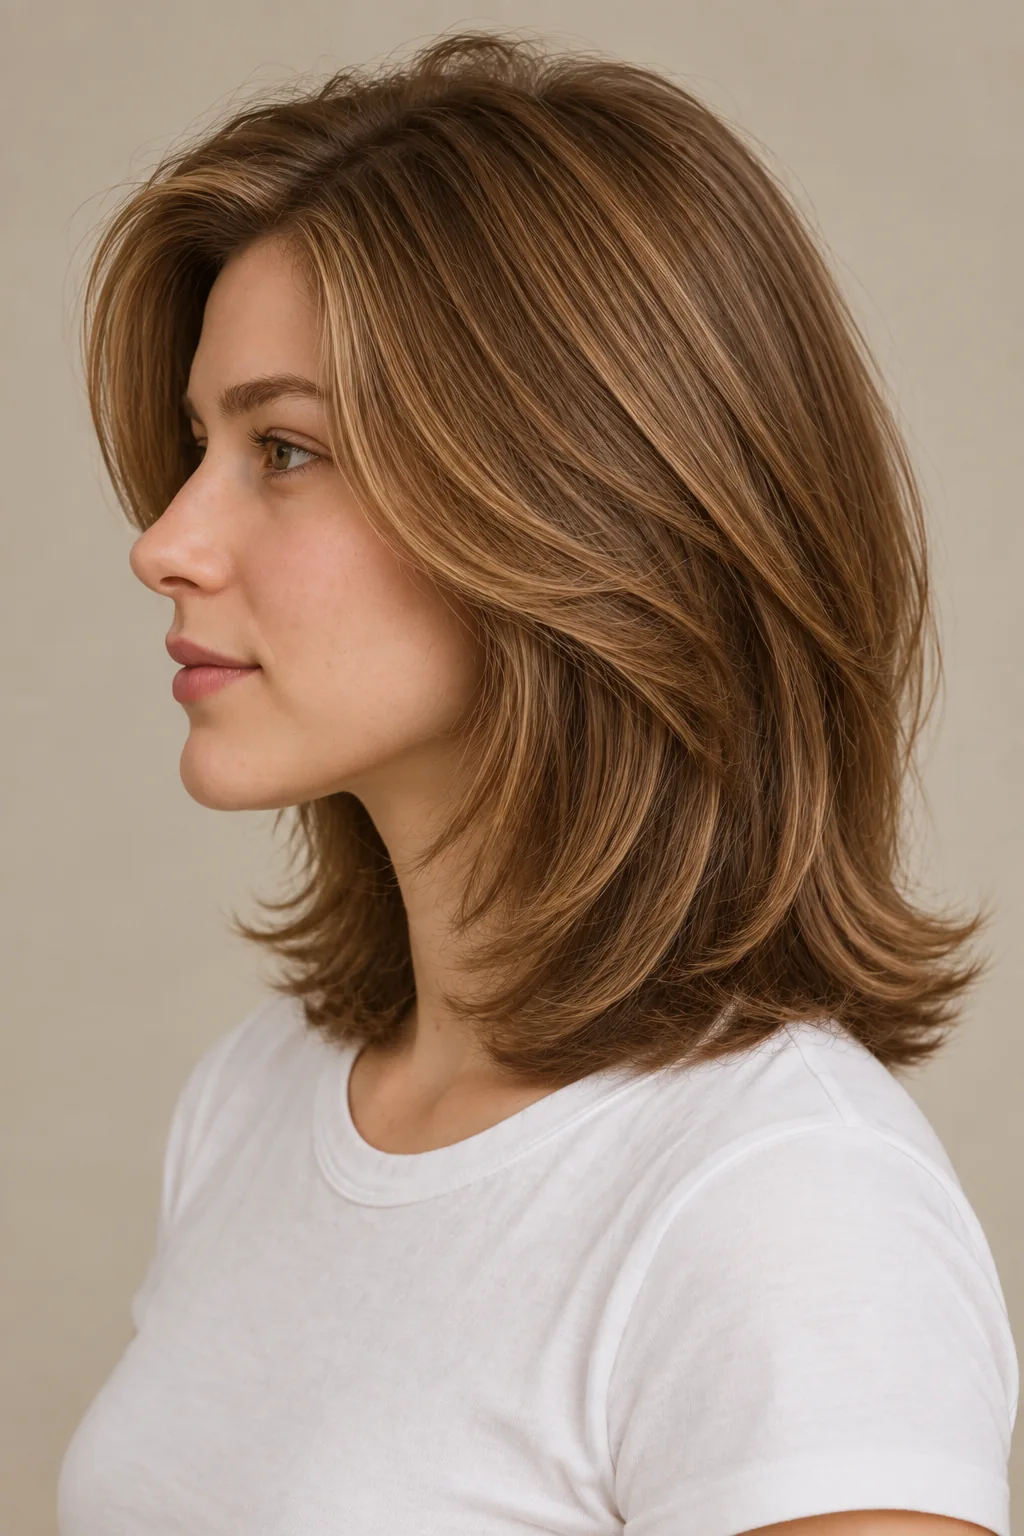
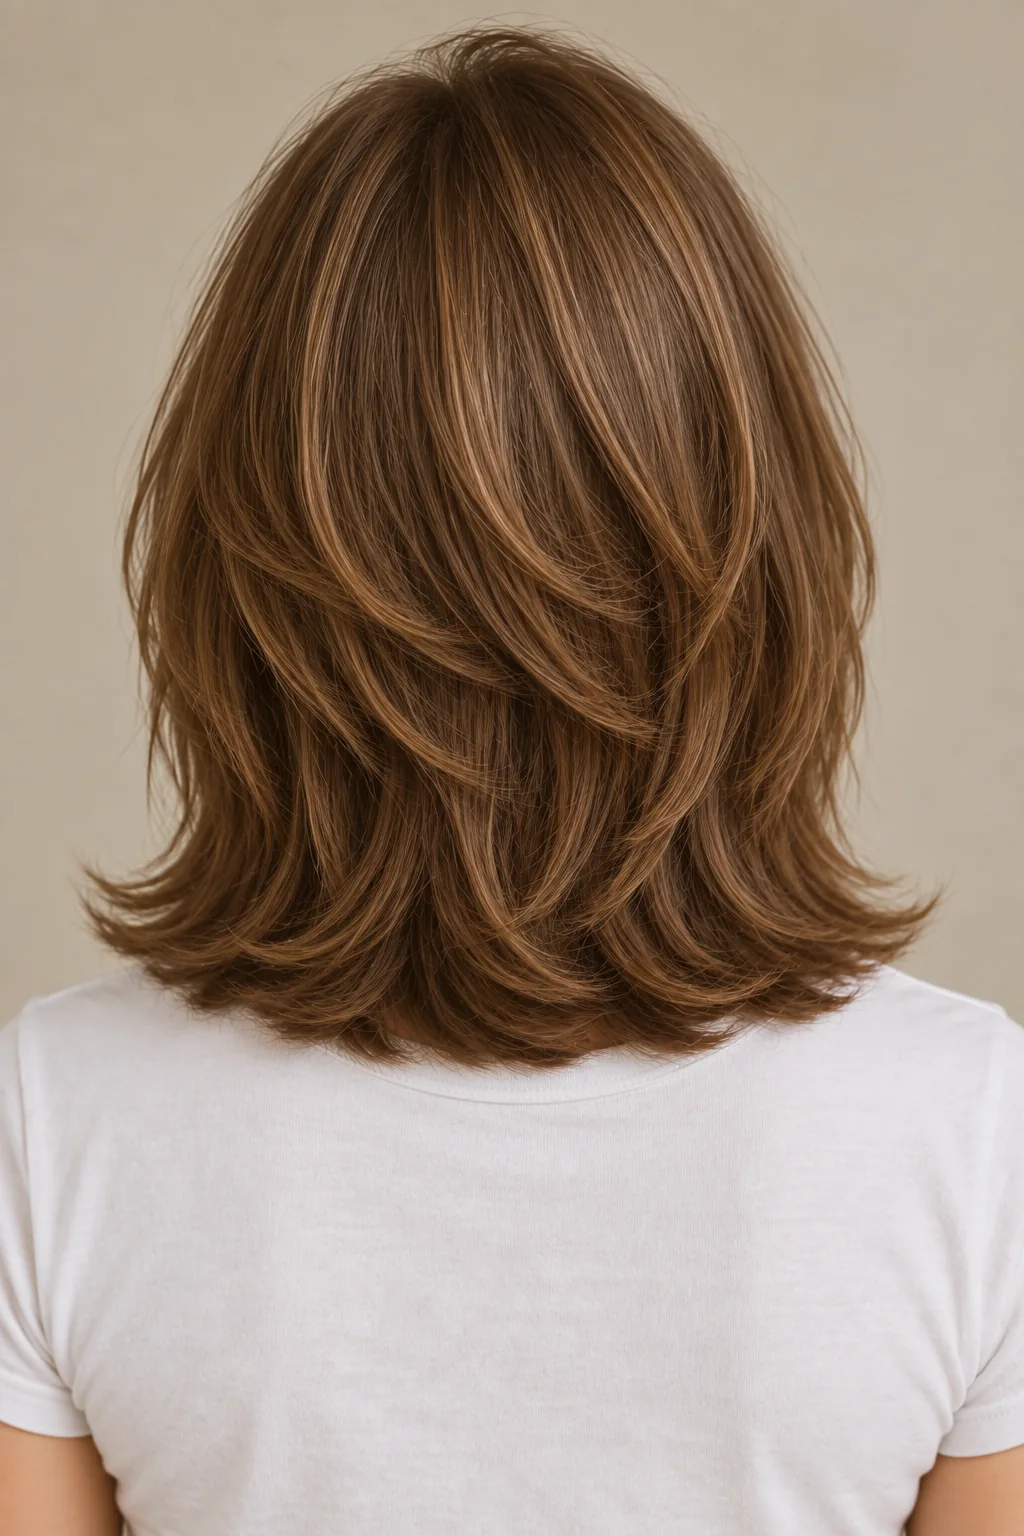
This Rachel-inspired reference has shoulder-length hair, a soft side part and connected layers that frame the cheekbones and jaw. Its rounded fullness also comes from styling: the roots are lifted and the front pieces curve inward. A photograph of the finished blowout does not show how those same layers fall when left to dry naturally.
Real Simple’s stylist interviews distinguish the original layered, voluminous shape from softer modern interpretations. Decide which part you want: a strongly rounded finish, the face framing, or a quieter version you can wear with less shaping. Those choices need not lead to exactly the same cut.
Find the shortest piece before agreeing to “lots of layers”
Ask your stylist to hold the proposed shortest front piece against your dry hair. Where does it land beside the cheekbone or jaw? Can it tuck behind your ear? Does it sit differently in your usual parting? A small reference image can make a short curved piece look longer than it is.
Check the upper layers as well as the front. Their length affects where volume gathers, but cutting them shorter does not guarantee easy lift. Your density, growth patterns and styling routine affect that result. The transition toward the shoulder-length perimeter should stay connected, without isolated short panels or a separate cap.
Movement should not cost you the ends you want to keep
Layering changes how much hair reaches the bottom edge. If your ends already look sparse, ask whether fewer, longer layers would preserve a more substantial outline. Fine strands and low density are separate considerations; your stylist needs to assess both rather than assuming every fine-haired client needs more layers for volume.
In Harper’s Bazaar’s modern Rachel interviews, stylists discuss softer shoulder-to-collarbone shapes and retaining a firmer perimeter for fine hair. Treat those as options to discuss, not a requirement to copy the model’s sectioning.
| What matters in your hair | What to agree with your stylist |
|---|---|
| Ends that look thin | How much of the perimeter remains full, and whether the layers should start lower. |
| Dense sides that feel heavy | Where to remove weight while keeping the overall outline substantial. |
| Straight hair that lies flat | How much lift comes from drying technique rather than the haircut alone. |
| Waves around the face | Where the shortest pieces land after their natural bend forms. |
| Curls or coils | The dry layer lengths and shape in your usual texture, which this smooth reference cannot demonstrate. |
| A strong side part or cowlick | Whether the front layers settle without repeatedly fighting their natural direction. |
Choose what you want to keep—and what you would change
A longer front, fuller perimeter or softer shape can make the idea more compatible with your routine. Select your consultation requests below. They appear in your salon card; they do not change the reference used for the AI try-on.
Choose a routine before choosing the finished photograph
For the rounded reference, the useful sequence is to establish lift near the roots and then shape the lengths, especially the pieces around the face. Ask your stylist to demonstrate the section size, brush placement and inward curve you would need at home. Use appropriate heat protection and follow your dryer or styling tool’s instructions.
A softer modern finish can have less lift and straighter lengths, with only a small bend around the face. It may be the version you prefer most days. Ask to see that finish too, rather than judging the cut only after a full salon blowout.
If you usually air-dry, bring a photograph of your unstyled hair. Your natural waves or straight fall will remain part of the result. Avoid committing to short layers because the styled picture looks effortless; discuss which parts you would actually shape and which you are happy to leave natural.
Check the ponytail and the ear tuck
A shoulder-length base may gather into a low tie, but shorter face-framing layers can fall out. Ask your stylist to test your usual tie position and show you which pieces will stay loose. Keeping the front longer may matter more to your routine than reproducing the shortest layer in the reference.
Tucking the front behind your ears changes how the layers frame the face. If that is how you wear your hair during work, check that arrangement as well as the blowout. Clips can help with shorter pieces, but they are an extra step to factor into the decision.
Refresh the shape when its balance changes
As the layers grow, the shortest pieces move lower and the outline can feel heavier or softer. Ask for a refresh when the front no longer sits where you like, the ends need attention or styling takes more effort than you want. There is no single appointment interval that suits every version of the Rachel.
If you want to grow it longer, tell your stylist which length you are protecting. You can keep extending the perimeter while letting shorter layers catch up, or retain face framing and accept a more layered long shape. Repeatedly cutting the shortest pieces back to the original reference works against the first option.
Bring a description of your normal morning
I’d like a shoulder-length Rachel-inspired cut with a soft side part and connected face-framing layers. Please show me the shortest front and upper pieces before cutting and preserve fullness at the ends. I like the rounded finish, but want to see a simpler version that fits my usual routine.
Bring the side and back views as well as the front. They help establish the overall length and the connected layering. Tell your stylist how often you blow-dry, whether you tie your hair up and what you are willing to do between washes. Those details make the reference more useful than asking for the name alone.
Prepare my Rachel haircut salon card →Questions before choosing the Rachel
What makes a modern Rachel different?
Modern interpretations often soften the layering and allow more length or a quieter finish. The name covers several variations, so compare the shortest front piece, perimeter and amount of lift in your chosen reference. This page previews a shoulder-length version with a rounded blowout.
Does the Rachel need highlights?
No. Color can emphasize movement, but it is separate from the cut. This reference uses one brown shade; an AI try-on should keep your original color unless you separately request a color change. Discuss any salon color service independently.
Can I wear it with fine hair?
Possibly, with the layering adapted to your density and the fullness you want at the ends. Ask your stylist to show how much hair remains in the perimeter before committing to many short layers. A voluminous blowout does not prove that the same cut will look fuller without styling.
Is it a low-maintenance haircut?
That depends on the finish you expect and how your hair behaves. Recreating a lifted, rounded blowout can require regular styling. A softer shape designed around your natural texture may suit a simpler routine, but should be judged in that finish before cutting.
Do I need bangs?
This version has face-framing layers and a soft side part, without a blunt fringe. Adding bangs changes both the shape and the routine. Bring that as a separate request instead of assuming every Rachel reference includes them.